How til Make Your Own PCB med a CNC Maskin bruker CircuitMill
A step-by-step guide til PCB milling, isolation routing, drilling, og board cutting
Making your own printed circuit boards doesn't have til involve messy chemicals, expensive equipment, or waiting for a PCB manufacturer til deliver your boards. med a small CNC machine og CircuitMill, you can turn your PCB designs into physical boards right in your workshop.
Whether you're building a prototype, experimenting med electronics, or developing a custom circuit, CNC PCB milling gives you direct control over det manufacturing process. You can design a circuit in det morning og have a working PCB det same day.
In this guide, we'll walk through det process of preparing your design, generating CNC toolpaths, milling copper traces, drilling holes, og cutting your finished PCB.
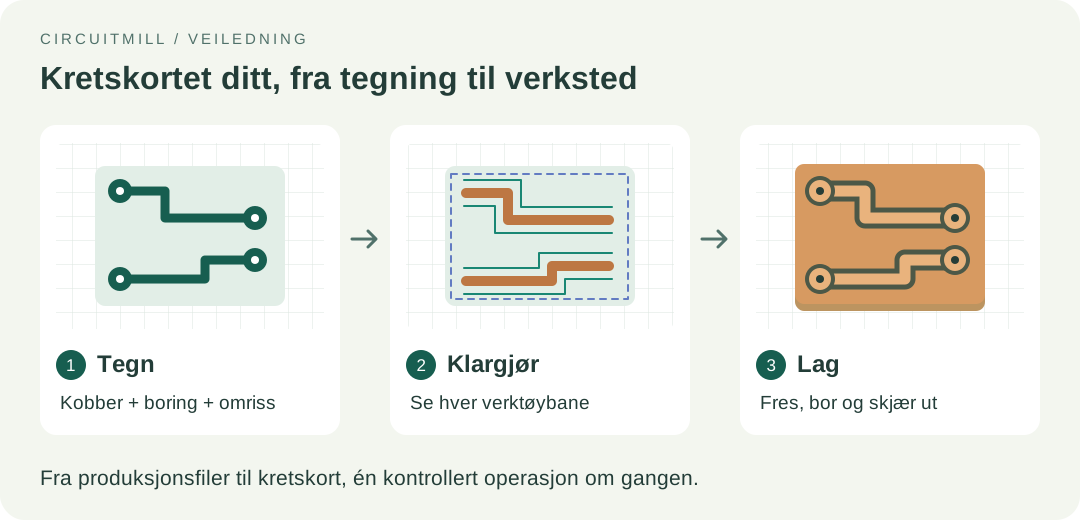
1. What Is CNC PCB Milling?
CNC PCB milling is a subtractive manufacturing process. Instead of bruker chemicals til etch away unwanted copper, a CNC machine uses a small cutting tool til physically remove copper fra a copper-clad board.
det machine follows precisely calculated toolpaths, creating electrical isolation between traces, pads, og copper-filled areas.
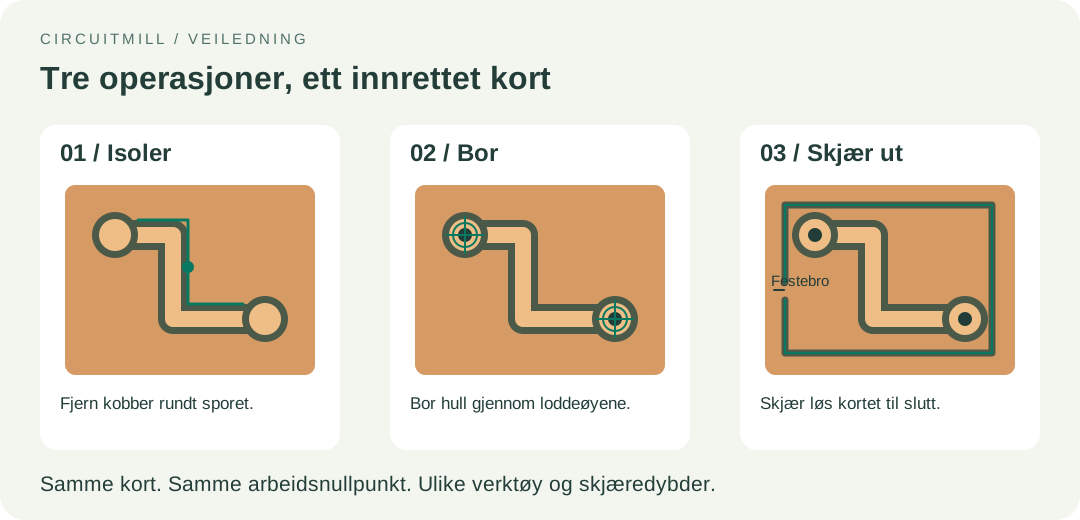
There are three essential operations:
- Isolation routing: A small engraving bit removes copper around traces og pads, leaving det electrical connections intact.
- Drilling: det CNC machine drills holes for through-hole components, mounting hardware, og vias.
- Kort cutting: Finally, det machine follows det board's outline til separate your finished PCB fra det surrounding material.
CNC milling is particularly useful for rapid prototyping, custom electronics, educational projects, og one-off designs. Unlike traditional chemical etching, it requires no etching chemicals og can be performed med an affordable desktop CNC router.
2. What You'll Need
Before getting started, gather det following equipment og materials:
- A desktop CNC machine, preferably med a sufficiently rigid spindle og accurate Z-axis control.
- A copper-clad PCB blank, such as FR-1 or FR-4.
- PCB engraving bits, small drill bits, og an end mill for cutting det board outline.
- A computer med your preferred PCB design software, such as KiCad.
- CircuitMill til prepare your PCB manufacturing toolpaths.
- A PCB fixture, double-sided tape, or another reliable workholding method.
- A suitable dust-extraction system og protective equipment.
for beginners, FR-1 is a practical choice because it is generally easier til mill og produces less abrasive dust than fiberglass-based FR-4. Always use appropriate dust extraction, particularly when cutting FR-4.
3. Design Your PCB
Start by creating your circuit board in KiCad or another PCB design application.
for your first CNC-milled board, consider a simple, single-sided design med relatively wide copper traces, generous spacing, og through-hole components. These characteristics make det board easier til manufacture og reduce det risk of broken traces or incomplete isolation.
Before exporting your design, check that all traces are properly connected, that your board outline is complete, og that your design-rule checks pass.
Keep in mind that a typical CNC-milled board doesn't have plated through-holes. for double-sided designs, you'll need til connect det two sides manually, for example med soldered wires or copper rivets.
4. Prepare Your PCB med CircuitMill
CircuitMill is designed around det three essential operations needed til manufacture a PCB med a CNC machine:
- Drilling — component og mounting holes.
- Isolation routing — copper trace separation.
- Kort outline — cutting det finished board.
Eksporter det fabrication data fra your PCB editor, including det copper-layer Gerber files, Excellon drill files, og board outline. Use det supported input format in CircuitMill til prepare det manufacturing operations.
Isolation routing
Velg a suitable cutting tool og generate paths that remove copper around your circuit's traces og pads. A wider isolation gap provides more electrical clearance, while a narrower gap allows denser layouts.
Drilling
Prepare det drill operations for your components og mounting holes. Different hole sizes may require different drill bits og tool changes.
Kort outline
Generate det cutting path around your PCB. Configure det cutting depth og consider leaving tabs til hold det board in place until machining is complete.
Preview each operation carefully before running it on your CNC machine. Check that det traces, holes, og board outline are aligned og that no necessary copper has been removed.
5. Set Up Your CNC Maskin
PCB milling requires relatively shallow cuts, so accurately positioning det board is essential.
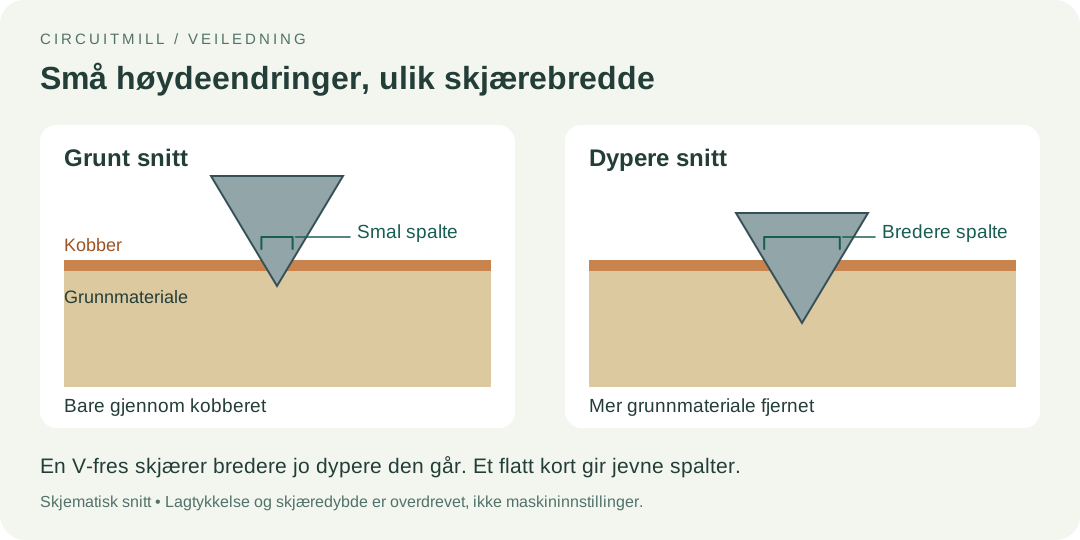
Secure your copper-clad blank til det CNC bed. Make sure it lies flat og cannot shift or vibrate during machining. Even a small variation in det board's surface height can significantly change det width of a V-bit isolation cut.
Install your engraving bit, establish det machine's work origin, og accurately set det Z-axis zero relative til det copper surface. If your machine supports surface probing og height compensation, these can improve results on boards that aren't perfectly flat.
Before starting det spindle, perform a dry run med det tool safely above det board til verify det toolpaths og work coordinates.
6. Mill det Copper Traces
Isolation routing removes a narrow channel of copper around every trace og pad. Once det surrounding copper is separated, each trace becomes an electrically isolated conductor.
Use a sharp engraving bit og a conservative cutting depth. det goal is til remove det copper og just enough substrate til ensure reliable isolation, not til excavate deep grooves in det board.
for a typical copper-clad board med 35 µm copper, a shallow initial cut is generally preferable. det precise depth depends on your bit's geometry, spindle runout, board flatness, og machine accuracy.
After milling, inspect det traces for incomplete isolation, copper burrs, og damaged pads. A multimeter in continuity mode can help detect unintended connections.
7. Drill det Holes og Cut det Kort
Once isolation milling is complete, switch til det appropriate drill bits og machine det component og mounting holes.
Use det hole sizes specified in your PCB design. Make sure til maintain det same work origin between operations so det drilled holes remain correctly aligned med det copper pads.
Neste, install your board-cutting end mill og execute det outline operation. If det board is small, leave holding tabs or otherwise ensure it cannot move during det final pass.
After cutting, remove det PCB, clean up det edges, og carefully deburr any rough areas. Remove machining dust bruker appropriate extraction og cleaning methods.
8. Inspect og Assemble Your PCB
Your board is now ready for electrical inspection og assembly.
Check for shorts between adjacent traces, verify continuity along important connections, og inspect det drilled holes. Pay particular attention til fine-pitch footprints og areas where copper clearances are small.
Clean det board before soldering. Solder your components, taking care not til overheat or lift det exposed copper pads.
Since CNC-milled boards typically lack a solder mask, avoid accidentally bridging nearby traces med solder. for double-sided designs, install og solder any required via connections on both sides.
med these checks complete, you can power up og test your circuit.
Tips for Getting Better Results
Start med generous clearances. Wider traces og larger gaps are easier til mill reliably, especially on an entry-level CNC machine.
Keep your PCB perfectly flat. Kort flatness is one of det most important factors in successful isolation routing. Use a properly surfaced spoilboard og reliable workholding.
Calibrate your machine og tools. Test your spindle speed, feed rate, og cutting depth on a scrap board before attempting a complicated design.
Always inspect your toolpaths. A toolpath preview can help you catch missing holes, incorrect board outlines, og routing mistakes before they become wasted material.
Why Use CircuitMill?
Turning a PCB design into machine-ready instructions involves more than simply exporting a drawing. Isolation routing requires accounting for cutter geometry, drilling requires accurate hole placement, og outline cutting must leave det final board med det correct dimensions.
CircuitMill focuses on simplifying these manufacturing operations so you can spend less time preparing toolpaths og more time building electronics.
Whether you're creating your first homemade circuit board or regularly prototyping new designs, det goal is det same: a straightforward path fra your PCB layout til a finished board.